
Install OpenSSL on Linux or Windows
Check-in terminal whether the Open SSL is installed or not.
📀
Checkout to install Open-SSL on Windows.
if installed then run the below command
openssl req -x509 -out localhost.crt -keyout localhost.key \
  -newkey rsa:2048 -nodes -sha256 \
  -subj '/CN=localhost' -extensions EXT -config <( \
   printf "[dn]\nCN=localhost\n[req]\ndistinguished_name = dn\n[EXT]\nsubjectAltName=DNS:localhost\nkeyUsage=digitalSignature\nextendedKeyUsage=serverAuth")
it will generate the localhost.key and localhost.crt file.
💡
It will generate the localhost.key and localhost.crt file Only for One Month of Validation. You will need to regenerate the localhost.key and localhost.crt again.
Import SSL Certificate
Import the SSL certificate through a browser like (Chrome). Search the SSL keyword in the Chrome settings search bar.

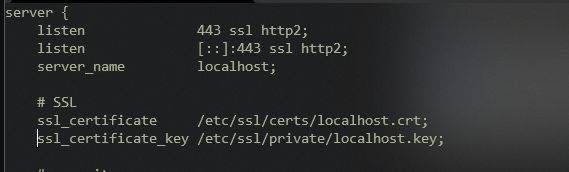
Configure SSL in Nginx
Open-enabled site Configuration. Add the below line to the configuration. replace the path of localhost.crt and localhost.key in config.
ssl_certificate     /etc/ssl/certs/localhost.crt;
ssl_certificate_key /etc/ssl/private/localhost.key;
And Restart the Nginx server.
That's It.